Monday 28 December 2015

The Baskerville Burner


Now pine cones are arguably nature's cross between a feather stick and kindling, it's just getting them going that's the trick because they are actually pretty good short term fuel. The above picture is from a few years ago of a kelly kettle powered by cones that was keeping me supplied with tea as I painted the fence.

Not so long ago I was involved with helping produce The Outdoor Adventure Manual, a book which was a joint venture between The Scout Association and Haynes Publishers. In the fire section is a piece on Baskerville burners, which are effectively pimped up cones for use in fire lighting invented at Tolmers Scout camp. They also make an appearance on a Victorinox fact sheet (that I also helped with) that supported the Scout Survival Skills badge. As well as being pretty effective they are simple, and rather good fun to make. 


There are three things you'll need to make a burner; Obviously you'll need a pine cone (and things are made much easier if the scales are slightly open), some thin dry twigs of straight shavings and papery silver birch bark, I've used Himalayian silver birch bark for this one, the super peely ones that you find in towns.


Now take the thin twigs or shavings and find three or four that are approximately the same length. I've used some wood shavings that I saved from a bowdrill session a while ago.


These need inserting evenly about a third of the way from the base of the cone and they should be a few centimetres taller than the cone's base. again you may have to force the wood in if the cone isn't that open.


Next stuff some of the bark into the gaps between the cone scales and leave the pieces sticking out, these only really need to be in the gaps near the cone's apex. This will obviously be a little harder if the cone isn't very open. You can also try stuffing it then putting the legs in but it can be a bit tight if the ideal gap for one is filled with bark.


And now this  'Little Sputnik' is now ready to light. A trailing piece of bark at the base (the cones former apex) is ideal to start it off with a match. The original also suggests putting some fine kindling underneath as well, but this example is rammed with birch bark so I didn't bother.


The featherstick like shape of the cone soon helps it catch as the flammable birch bark burns. If the cone is more shut than you'd like it does take a little while longer to fully ignite and you can feather the edge of the legs to help. You can just see that one of the legs is starting to burn which will make it fall over, extra legs can help but with the cone alight it still does it's job. I still prefer using something like matchstick thin twigs as a kindling with silver birch, but these 'burners' are an enjoyable alternative.


And finally, here's a retro-recorded Youtube video on how to make one.


Saturday 7 November 2015

'Victorinox' Chopsticks


Some time ago I noticed a picture on social media of a bushcrafter using chopsticks and commented that they were perhaps rather overlooked as a utensil and the individual agreed. Fast forward to early 2016 when Bushscout's Terry Longhurst and I were on board with the Scout Association to help with the Victorinox sponsorship of the Scouts section's Survival Skills badge.

I was asked if I could come up with some simple projects that a Victorinox penknife could be used for. I suppose any knife would be useful in varying degrees in a true survival situation but ideally I guess most folk would want a fixed blade so I plumped for projects that would be both useful and around the whittling level of difficulty. the first one that came to mind was a pair of chopsticks. 

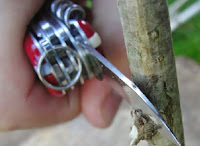
I used a Victorinox Huntsman to do these photos with as it has knife blades, scissors and a saw which I used but would favour a fixed blade. When using a pen knife always take out and fold in sharp tools with care, remember that a non-locking blade can potentially close on your fingers, and when using any sharp cutting tool think twice, cut once.


For this how to I've selected hazel which is both straight in aspect, easy to work and suitable for food use. I've cut two lengths that are about the diameter of a pencil and about a foot or so long (or about 30 cms).


The next step is to remove any lumps and bumps and trim the ends if necessary. Then strip some bark off at the business end, this needs to happen so that there's no potential to taint the food through taste, transfer of bacteria or dirt. 


Take one of hazel lengths and carefully shave off about 2mm all the way round the end, angling the blade slightly and using your thumb to do a controlled cut. Repeat on one end of the other length to. It isn't essential to the finished chopstick's function, but it does tidy up the end and is a useful cut to practice because if you are are going to baton a large stick into the ground it helps prevent the end splitting.


Now carefully cut around the chopstick to be's circumference with a blade, enough to just score through the bark all the way around about 3cms from the end. Do this by carefully turning the length and scoring the bark as you go and support the blade with your thumb if needed.


Now you need to use the blade to carefully remove the bark with a controlled, shallow slicing action. This set was made for the photo sequence but got used for eating with. If you are going to use them for cooking you'll want to take a bit more off because the reason for removing bark is that it can harbour dirt and bacteria and taint any food. If you cook raw meat with them remember that you may need a second set to serve/ eat with due to potential cross contamination.


Try bevelling the ends of the freshly de-barked sections (like with the other end). Not essential but useful as a bit of extra practice. It won't come as a surprise to find that this is pretty much a finished project but for those that struggle with chopsticks having a mind of their own... 
 

secure them together helps with control so towards the back of the sticks using something like nettle cordial (shown) or an inner length of  paracord, fasten using a clove hitch (shown), round turn and two half hitches or something similar leaving a gap of around 3 cm between the sticks. Adjust as necessary.


The finished article.


So you now have a tea bag fisherouterer, coal placer, cooking and serving utensil and of course eating food with. 


When helping as a Woodlife Trails course assistant I sometimes use chopsticks, well two unworked small pieces of straight kindling, to pick up a small coal to place in a buffed clematis bark mini tinder bundle if there are no fire dogs to be had to get the fire started on the courses.

Below is some of the badge promotion at the time...Oh, and as I've mentioned Victorinox and a specific Swiss Army Knife model in this blog page I'd like to just mention that I'm not sponsored by the company but it was representative of the project at the time.


Monday 26 October 2015

Woodlife Trails' Woodland Tracker course

and so I set off for the last Woodlife Trails course of 2015 with a bit of a hurried packing session. My eldest had had his appendix outearlier in the week and it had made spare time a premium product. I'd got a CD through the post on the Friday which I decided to take a play in the car...I consequently forgot to stick it in so it would have to be played on the way home then. 


The Woodlife Trails base camp in Hatfield forest had a mixture of trees around it which includes, amongst others, cherry and field maple. They had started to form a superb woodland carpet with their bright autumnal display. The bushcraft classroom chute was starting to catch them too.


I'd had several good fallow deer sightings on the way to the base camp (it is the start of the rut) having got there at the crack of dawn on the Saturday. As it got light I set up my sil-hex tent (minus the inner) with the door facing out to the ride with a Great Spotted Woodpecker chip chipping away, along with a briefly diurnal Tawny Owl.


A fair bit of firewood was collected and burnt on a cool and crisp weekend with a hint of precipitation. With the rain due I made sure that we had a kindling and tinder supple ready for Sunday.


The Woodland Tracker course gives the students a massive exposure to the world of tracking and there were some detailed classes on the Saturday with a lot of studious note taking.


But of course, a bundle full of theory is only useful if put to practical use and the clients were given a large dose of dirt time too with the Woodlife Trails diploma students doing a lot of mentoring.


I usually process fuel with a folding Bahco saw, but decided to bring along my homemade bucksaw which I have embellished with the Runic names of several indigenous tree species. It works but the joints don't bear close scrutiny for neatness.


Despite the fact that it is nearly November there were a lot of blackberries, sloes, haws and rosehips still up for grabs. My dinner was another foraged goody, Alexanders soup with parmesan.


The clients discussed the afternoon's sit spot exercise and what they'd seen, it is the fallow rut after all. The fire then saw much banter and once left it made you realise that there was a nip in the air.


After cross referencing my watch and mobile to check that I successfully negotiated the hour change I went for a bimble. The night had been chilly and the afore mentioned leaves formed a colourful backdrop to the moody mist. Venus and Jupiter watched down from above.

On the way back I saw about ten fallow deer running along a hedge but couldn't get my camera on them in time, and of course they are like drops of mercury once they get into cover.


Almost instantly I saw three more pronking fallow which headed into cover, with this one stopping to look back and me and who knows, maybe blew a raspberry.


I had the last laugh because I doubled  back a little and saw them break cover to head over to where the previous lot went. Score draw I reckon.


The morning  was started with  a mini cooked breakfast (which used my new trivet for), and followed this up with a bannock laced with brown sugar and semi dried fig pieces and washed down with coffee. A hearty breakfast but c'mon it was outdoors and it was cold so doubly justified.


School started soon after and whilst the clients took in some more theory we got the woodpile restocked as it had taken a bit of a beating in the night.


Again, the clients were also involved in lots of out and about stuff to balance out the seated information they had been given.

Now on the Saturday evening three of us set up trail cams along a ride and as you can see below I got a couple of different animals, the only camera to do so. Slim pickings for the trail cams but that's nature, you can back red and black comes up...


So that was the last official Woodlife trails course until February of next year. It's great to see people attending courses become really engaged and this was no different with some very switched on folk asking lots of questions and going away wiser than they arrived. It was also good to catch up with the Woodlife team as well, and even though I only help with camp admin I love seeing them. There's always top banter, lots of knowledge and the occasional bit of shared scoff. It's worth noting that the trail cam sightings were about 90 seconds from the base camp.

I remembered to stick the CD in on the way back, it was 'Pylon', Killing Joke's new one. The whole point of starting and ending with this fact is that it made me chuckle because the whole weekend was, amongst other things, about slowing down, mimimising noise and movement etc and here I was playing a CD that was pretty much the opposite end of the scale!