Well having made a drop point full tang knife blank on my recent Kaos Blacksmith day (well lucked out 1-2-1) with Ross Berry which I'd never done before I now have to fit some scales to it...Which again I've never done before.
I decided to broadly replicate a knife I had made for me a few years ago and purchased some birch scales, black liners and brass loveless bolts. The scales were basic ones (as opposed to top end) because I didn't trust myself not to make an unrecoverable mistake. I decided to get this journey down in words and pictures to both look back on, and to help anyone else attempting this skill.
Firstly there were a few criss-cross marks left on the knife blank spine from it's former life as a steel blank, and there were a few post hardening and tempering dark marks on the blade which would need sanding off and I did this first.
Then to the scales which I used a pillar drill that Ross had in his forge for accuracy. I drilled the pilot holes for the loveless threads and then part drilled the larger holes to accomodate the fatter loveless bolts. With hindsight I would have drilled the larger holes a little deeper. Back at home I fastened one scale on at a time, drew around the tang with a fattish marker pen and cut them out. I used a large line on purpose so that when I cut them out using a jigsaw I knew not to cross it to leave a little spare.
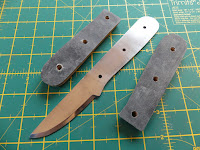
Once I'd got the basic scale sanding done (including making the internal face of one of them flush) I then cut out the liners, again with a little spare, roughed all the surfaces up and glued a scale to a liner using two part glue and clamps. I've seen many glues mentioned when researching this subject but I found a DIY store own brand one has left them gripping like you know what to a bear's fur. As well as the aesthetics of using liners I'm also told that they help as a useful material that bonds well to wood and metal.
So far so good but I but I was now at the stage where a full on sanding fest was both unavoidable and needed. Oh for a belt sander! I masked the cutting edge and sanded around the edges whilst they were roughly bolted onto the blank, worked on the edges whilst both unbolted from the blank and bolted liner to liner.
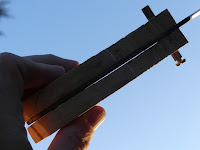
I kept checking and re-checking that both sides were level on a regular basis, as you can see here the right hand side needs a little more work. I used an orbital sander, sandpaper and wet and dry.
Once I'd got the scales/ liners close but no cigar to the shape of the blank I decided to fix them all together. I felt that I was at the stage where an over zealous burst of sanding would leave me thinking that I should have measured twice and sanded once. I roughly measured the depth of the scales against the loveless bolt length and decided to drill the whole way through as they were almost at that stage anyway. I has a run through and then committed to the same two part glue...And had a temporary banana fingers moment.
I'd initially decided to go with two bolts and then at the eleventh hour gone for a third. I screwed one bolt in, unscrewed the thread, inserted the bolt on the other side and then screwed right through leaving the threaded part sticking proud both sides. Ironically I couldn't get the bolt all the way through on the extra middle bolt so I left the bolt sticking out some way, cut it off when dry and then threaded it in the other side and again cut it off.
So the post gluing report reads that the middle bolt is more decorative than the other two and that I got a small amount of adhesive on the scales. I'd imagined that I would so I was pleased that I'd not sanded closer before sticking the scales as I could sand it off. The only thing I wish I'd done was to leave the liners a little more flush at the front of the scale (where it meets the blade) as I realised that I couldn't really sand it any more without abrading the blade surface. They are close but it is a bit annoying.
I used a metal file at this stage to smooth down the cut threads and the top of the front bolts as they stuck up a little due to the front being a little thinner than the rest of the handle. After that it was a case of working through the grits again using a coarse sheet on the orbital sander, to medium sand paper to a quick tickle with fine 600 grit wet and dry until I couldn't catch my nail on the liners. The final sand with the scales on was the main reason that I didn't leave the blank with the natural forge finish on it as I would have sanded the tang shiny.
Oil
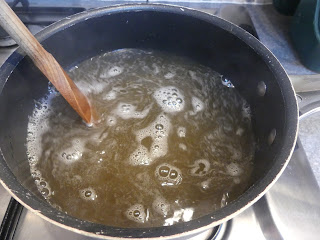
I was then at the stage where I felt that I couldn't improve on the sanding job that I'd done and that it was time to apply a finishing coat of oil to the scales. I plumped for boiled linseed oil over Danish oil (cheaper and useful for applying to my garden furniture at a later date!).
Linseed has an unfortunate quality in that it can spontaneously combust if left in certain conditions on a rag, so once I'd wiped the knife over I burnt the clothes that I used to a) dispose of them and b) See how they burnt. I have to say that I expected the applied match to make them go 'Pfff' as they ignited but it didn't happen. However they did burnt steadily for some minutes and they seemed to burn in a similar fashion to charcloth, and being black probably added to this. The linseed oil made me think of the smell of putty into which it is added. If you are from a younger demographic you'll probably have to look it up, and whilst you are searching look up the joke about putty and toothpaste...

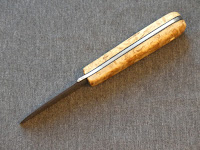


Overall this has proved to be a very satisfying project, both making the blank with Ross and to finishing up with a usable knife. I've mentioned the odd thing or two earlier but there are a few more that I wish I could sort; the handle is a tad too long which resulted in the scales finishing about a centimetre short of were I'd actually like them to. I'd like to have liked to have got a noticeable palm swell on the handle but equally it's tapered towards the front and is comfy, with hindsight I would have stuck a lanyard tube in and I wish I'd drilled just a little deeper when I had the pillar drill usage as a couple of the bolts are in holes that are just a smidge too flared. It's that situation where if I were to do another full tang knife that I would take on board all the minor learning points and probably make a much slicker job of it.

That all said they are only cosmetic, the knife is fully functional and rather handsome. Just the little tapered tang neck knife and a couple of sheaths to make...