Sunday 31 December 2017

Unexpected Garden Visitor


in October my eldest went to a Spaianish island for a week of work experience which he'd won in a writing competition. On the 4 o'clock get up for the airport my son and wife spotted a hedgehog in our garden.


A few weeks passed and I spotted the tell take small cigar shaped droppings of a hedgehog So I had a quick squint at several website pages the RSPCA's hedghog care information and dug out some mealworms from our supply of bird table food.


I had my trail cam out already set up in the garden as I had a chicken carcass out to try and attract Red Kites in (memories of Steve the rabbit). Here you can see the meal worm bowl as I remove the chicken for the night. The RSPCA site said that chicken, if left out, must be finely chopped for hogs whereas all the pieces were deliberately large for Kites to potentially grab.


We also get a load of cats passing through that would have scoffed the chicken if left out and indeed they quite often pass a movement too!


And sure enough we had a visitor, not once but on several (but not necessarily consecutive) nights. Apparently they can cover a couple of kilometres in a night so it's perhaps not surprising that we didn't have it at our beck and call.


I set the trail cam up in several different locations and swopped over the chicken and the mealworms depending who I was enticing. I keep chicken carcasses in the freezer so I was able to do so over a number of days. When it visited it cleaned the bowl out.


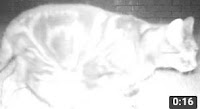
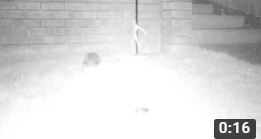
We noticed that the hedgehog had a light mark on it's left hand rump which looked a bit odd, and boy did it scratch a lot as seen in the above movie clip.


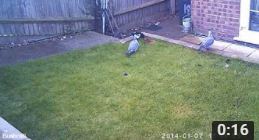
Due to the regular visitations of cats I decided not to use cat food for obvious reasons but if we had the odd night that the hog didn't visit the birds were in there like a shot. In the above clip one of the pigeons actually scares the Magpie off which I've not seen before. Actually the Wood Pigeons regularly ate from the chicken carcasses meant for the Kites. On that note I've had the Kites swoop into the garden but as yet I've not managed to capture it with either my trail cam or my DSLR set on movie mode inside.


Saturday 30 December 2017

Paul Kirtley Tree & Plant ID Masterclass

As I'm sure you may know Paul Kirtley is a great sharer of information in many guises from blog to his ongoing #askpaulkirtley series and to be honest I can't think of a professional bushcraft/ outdoors instructor who can match his output. So when an email came through about a new online course I was curious to see what it was all about.


The Three Fs promotional video has Paul using it to define what the course was all about (not surprisingly), it was the launch of his Tree and Plant Masterclass. You'll need to set aside about 40 minutes to view it and I recall some folk on social media saying that it was a bit too long, well it is long I grant you but if you are serious about ID you'll need to commit time to the course anyway but more on that later. There are various links on this page which will get you more information.


Basically to sum the video up it said that books and courses can touch on tree and plant ID but never do it in any great depth and that this course takes all the information needed and distils it into seasonal modules. I recommend that you watch the whole way through but if you watch from about the 24:10 mark you'll get a view of what has been distilled into the masterclass. 


 At the end of the original video Paul talks about the cost of joining, now you might be familiar with the Austin Powers franchise, well the introductory video, when it got to the cost, reminded somewhat of the famous Dr Evil  one hundred million dollars ransom scene

I'd made my interest in joining during my sabbatical known to Paul and he messaged me to say that there was a early bird booking portal open which I assume will run year on year but please check and don't take my word as gospel. Like the Frontier Bushcraft courses the masterclass offered a money back guarantee, specifically if not satisfied after the first month which I assume will still apply but do please check. 


I think the first thing to say about the Tree and Plant Masterclass is that it is, quite literally, a masterclass on trees and plants 'From  a bushcraft and survival perspective' (a phrase you hear a lot during the modules). The second thing to say is that it isn't a bushcraft 'How to' course and whilst uses and techniques are discussed Paul encourages the user to visit his copious volume of work across several media channels to cross reference. Equally, this isn't a series of videos where Paul just says 'This is a useful dandelion' and 'This is poisonous Hemlock', the modules take you into some detail about the flora from genera to Latin names to knowing your drupes from your stomatal bands. 

I'd suggest that if you are the sort of person who really wants to advance their identification skills and stops to look at every tree and plant when out and about then seriously consider it. It's also worth noting that it isn't centred just on the UK but covers Europe and North America too.


There is one vaguely similar course that I'd previously signed up for online and that is Marcus Harrison's wild food mentor which I joined in the Spring of 2011 and whilst it supplies useful information and recipes it is limited to edible plants only. I also searched for other similar courses to offer a comparison and the nearest I could find was a limited place course (February to August) which has a tutor assigned to each pupil who oversees the 'homework' and makes corrections. The masterclass covers more, is bushcraft specific, runs right up to the end of the year, is updated and is well priced against this.

Now to illustrate what you will see during the online tutelage I have done some screen grabs but I've deliberately tried to make them basic but representative because I don't want to give too much away. It's both Paul's baby and also I wouldn't want to spoil the experience for those following on after me. It is worth mentioning that this package is separate from Paul's body of work that he puts out, he has purposely made it so that the sections can't be downloaded and viewed later as this is a source of income for him and downloads could be shared around. 


Well I'll start right at the very beginning. This is a shot of the opening welcome video that gives you an overview of the course. There is also a members area to introduce yourself in too.


There are other videos but  the information sections (screen casts) use the standard screen (above) onto which information and pictures are projected at the correct time with Paul narrating in some detail throughout. He also adds any apposite links to his blogs etc and encourages the listener to use any knowledge that they have to aid the learning process. You'll see this style in parts of the 3 Fs video mentioned earlier if you watch it.


The modules are released for viewing at the appropriate time in the year which gives you plenty of time to study and get outside. The seasons during my year were a little out of kelter but there's not a lot you can do about that! Interestingly module eight was a little delayed because Paul had re-recorded it and the sound levels weren't brilliant on it and he had to re-do it. It did hold up the module up as stated but actually I drew a positive out of this in  that it would have been easy for Paul to rest on his laurels but he pro-actively wanted to improve the module content. It's also worth re-iterating that there was still plenty of information to digest in the previous seven modules at that moment in time. 


And this is a general shot of the navigation dashboard early on in the course which has module and forum access plus any house keeping announcements that Paul occasionally added. It should be stated that the masterclass has migrated to a general learning portal since I did and this screen is from the previously separate masterclass.


And yes homework, you didn't think Paul was going to just spoon feed you did you? Again all relevant to the season and current module and this is a timely point to reinterate that you need to allow time for this masterclass. Out of this section sprang my Facebook album entitled #myhomeworkwood and another called #treeplantid which is the tag that Paul encourages those signed up to use when putting pictures up on social media platforms. My pictorial offering by the end of the course was, at one stage, in excess of 300 pictures which to be fair also included some non-bushcraft species too.

As well as homework the course also offers several printable worksheets too.


There is also a live interaction with Paul in the shape of six webinars, well seven actually as he added a  bonus one in towards the end of the year that I did it. They are usually scheduled on a Tuesday between 7:30 and 9:30 although they often went on past this time. You hear Paul's voice in real time and reply via the small white panel in the top right of the above picture. If you don't type anything for a while the white panel minimises but a click on the red tab brings it back.


They are a good mental workout of your knowledge with lots of questions appertaining to pictures displayed on your screen (from Paul's 60,000+ collection) and then you type an answer or response if you know. Paul often announces who's  got the answer correct but don't expect everything you type to be acknowledged as there is one way traffic to Paul who is also trying to narrate whilst reading. That said he does a decent job of it and genuinely seems to enjoy the interaction and banter of the evening. Course attendees also have the opportunity to drop Paul a question for consideration at the end via a dedicated webinar email address.

Interestingly Paul has said that he is do an extra more detailed webinar for masterclass veterans...


When I joined the portal had a forum which Tree and Plant Masterclass which started off with a flurry of posts but then went quiet, not sure why but the masterclass Facebook page was started during my year which is much livelier. Just a quick note on this group it's for course members only, hence that fact that I haven't linked to it.

It's fair to say that the course isn't cheap but for anyone who thinks it is pricey should note that the total duration is around three full days worth of content with one module at just over four-and-a-half hours of running time. It is also worth noting that this is way more than the time an individual could spend on a weekend course learning.

Add to this around twelve hours of webinar time (with the extra one and the veteran ones that can be potentially added in) and the fact that once an individual joins they have a lifetime membership...


I'll just finish with a screen grab from the Frontier bushcraft which was taken from a course review article I did for Bushcraft & Survival Skills magazine a few years ago. The course isn't run anymore but website oxymoronic quote concerning time seems to sort of fit the masterclass...The course that keeps on giving.

Oh, and Paul says 'Grass' (gr-ass) and not 'Grass' (gr-arse) which is alright by me...


Suggested further reading.


Thursday 30 November 2017

Fire Cider


Turmeric has long been held in great esteem, it is from the same family as ginger and has a decent health C.V. which includes anti-inflammatory and anti-oxidant properties amongst others. It also appears in recipes for consumable drinks etc to boost the immune system. I want to make one for the winter so I followed this Tumeric heavy recipe for fire cider.  I often make a simple Elderberry syrup but I procrastinated and missed them this year. 


I managed to get hold of fresh Turmeric and it has a really pleasant aroma. It also colours curry powders and I was wary of it colouring anything I touched but I manged to get it everywhere without trying!

 Future preparation will see me using a parchment paper covered chopping board on a newspaper covered work surface and me wearing disposable gloves. I elected to grate rather than chop to maximise the surface area but it was probably the drawback too. I made me realise how easy it is to spread germs or chicken juice with your hands...  


This is a quick (and arty) shot of some of the ingredients. You can see varying degrees of chilli, lemon, rosemary, turmeric, onion, garlic and ginger. I eased back on the onion and just bruised the garlic as I feared an exclusion zone around me if I made it with the full on allium quota.


The prepared ingredients where then added to apple cider vinegar and allowed to steep for a short while. 


I added the honey after I got the other ingredients mixed together. I microwaved it to make it runny and then added it and then stirred for a while.


I found some dried Coltsfoot which is excellent for chesty coughs and also managed to forage a few Hawthorns and Rosehips to add (the hips needed the hairs and seeds removing first).


It is then bottled and has to steep for a month as per the caveats when using knitbone to treat a broken rib earlier in the year. Now just before l bottled the stuff l caught a cold and drew off a dessert spoon of the liquid and consumed it daily and the cold didn't really amount to much.


I also added an additional dessert spoon of honey to each vessel because despite the original us strained connection being tangy yet palatable, l want to encourage my family to consume it too. 


I'd have liked to have  saved the Turmeric in a little reserved liquid due to it's beneficial qualities but as you can see it was rather tangled with the other ingredients so this didn't happen. 


Saturday 28 October 2017

Closed Tarp Tent


My Youtube video of how to make a closed tarp tent.

 l did  an article for the Bushcraft Magazine Autumn 2016 edition of how to build a basic tent out of a tarpulin (a tarp tent). The blog page how to is can be found hereThe following version that I've called a MK II wasn't used used as a follow up article so l've decided to blog them myself...Better out than in.


It follows roughly along the same lines as the MK I  how to I did but it's a more enclosed version. 


As with the afore mentioned MK 1 tarp tent version this one starts with a 3m x 3m laid flat in a suitable flat spot with no ants nests, broken branches above etc. Note the ridge line runs top to bottom, this doesn't need to be so but I think it helps during the construction.


I've added this loop of yellow hi viz paracord 550 to the central fixing point on the bottom edge of the tarp, and a green one to each of the bottom corners for orientation purposes later.


Next stage is to peg out the two top corners that will go on to form the back of the shelter, this varies slightly from the MK 1 which needs the fixing points to the side and below the corners pegging.


Now grab a couple more pegs and pull in the two green hi viz corners and peg them in the centre. Note the green hi viz paracord in the above pic near the central fixing point marked with the yellow hi viz paracord.


After pegging you will end up with a slightly bunched lower edge, and a straight upper edge  to the tarp. The bunched bit will ultimately become the entrance/ exit.


Now to put the pole in this structure. I'm pointing to the central fixing point on the ridge using an adjustable pole in this instance. This differs from the MK 1 because that is supported on the loop nearest the front. The length of pole however is not too dissimilar at around three feet.

Also as before make sure the pole sits in the reinforced area around the loop and not on the material, and place a small piece of flat wood or stone on the ground to support the pole if the ground is a little soft.


So this is the bit where you have to be a bit nifty. Make your way through the gap between the green paracord  pegged loops, and the yellow paracorded central loop with pole in hand.


Now position the pole accurately under the central ridge line fixing point and vertically onto the ground, or a ground support if one is needed.


Once that is done satisfactorily you should be left with a fairly recognisable tent like structure with a slightly flappy, but fully enclosed front.


The flap on the MK 1 is pegged to the side and centrally at the front of the tent with another guy line and peg. This design sees the flap laid across one side or other as shown. Note the yellow paracord just visible near my left hand.


Making sure you have the flap taut secure it with a peg, it should fit through the nearest fixing point on the edge of the tarp tent itself.


Although  the previous information demonstrates where and how to fasten the door flap, it isn't conducive to getting in the tent once it's secured! To do this you simply get in, fold the flap over the best you can, locate it and peg it through the other loop. a longer length of paracord passed under the tent can help this to be a smoother process. 


And that is your Mk II tent complete. Well I say MK II, but there are lots of variations that are hybrids between a shaped tarp and a tent like structure, such is the versatility of a tarp. This has a similar footprint to the MK I but look out for  condensation in this one.

Suggested further reading:-